Post by Blind on Apr 7, 2009 7:43:19 GMT -5
This tutorial will teach you an easy method of turning your photograph of a city into an effective ghost city.
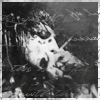
Let’s start by having a look at the final result.

This is the photograph I began with for the tutorial:

You can use any photograph you prefer though.
To start off with add your photograph to a new layer.
First we want to add a few colour overlays to make the city look a bit darker and eerie.
We want to create a new layer and completely fill it with a very dark brown colour. I recommend using this as the colour #150c00.
After filling the layer with that colour we want to change the layer to “Colour” and set the opacity to around 80%

Your photograph should now look like this:

Next we want create another new layer.
On this layer we want to completely fill it with a dark gray colour, I recommend using #111111.
Set this layer to “Overlay” with an opacity of 70%.

Your photograph should now be looking like this:

It is starting to look a little bit creepy now.
Now for the next step!
Create a new layer. On this layer we want to apply each layer into one single image. To do this make sure your new layer is selected and then click on “Image” from the top menu bar. From the drop down menu click on “Apply Image”.

You may get a pop up window after clicking on Apply Image. If you do just click on “Ok”.
Now with that layer selected go to “Filter” in the top menu bar, then down to “Render” from the drop down menu and finally click on “Clouds” from the next drop down menu.

After clicking on clouds your image should look similar to this:

Now set that layer to “Overlay”

We now want to duplicate that layer four times. This will make your photograph look like this:

Now select the fourth duplicated layer and go to it’s blending options. You can do this by right clicking on the layer and selecting “Blending Options”.

Once inside the blending options menu select “Colour Overlay” from the left menu and use these settings:

Then click on “Gradient Overlay” from the left hand side menu and use these settings:
Now click on “Ok” to save your changes.
That is it, you have turned a photograph of your city into a creepy ghost city.
This is the final result:
Hope you enjoyed.
- Jye
This tutorial is copyright to Creative Design Forum and Transcendent Studios 2009
If you liked this tutorial feel free to register an account if you haven't already done so.
Let’s start by having a look at the final result.
This is the photograph I began with for the tutorial:
You can use any photograph you prefer though.
To start off with add your photograph to a new layer.
First we want to add a few colour overlays to make the city look a bit darker and eerie.
We want to create a new layer and completely fill it with a very dark brown colour. I recommend using this as the colour #150c00.
After filling the layer with that colour we want to change the layer to “Colour” and set the opacity to around 80%
Your photograph should now look like this:
Next we want create another new layer.
On this layer we want to completely fill it with a dark gray colour, I recommend using #111111.
Set this layer to “Overlay” with an opacity of 70%.
Your photograph should now be looking like this:
It is starting to look a little bit creepy now.
Now for the next step!
Create a new layer. On this layer we want to apply each layer into one single image. To do this make sure your new layer is selected and then click on “Image” from the top menu bar. From the drop down menu click on “Apply Image”.
You may get a pop up window after clicking on Apply Image. If you do just click on “Ok”.
Now with that layer selected go to “Filter” in the top menu bar, then down to “Render” from the drop down menu and finally click on “Clouds” from the next drop down menu.
After clicking on clouds your image should look similar to this:
Now set that layer to “Overlay”
We now want to duplicate that layer four times. This will make your photograph look like this:
Now select the fourth duplicated layer and go to it’s blending options. You can do this by right clicking on the layer and selecting “Blending Options”.
Once inside the blending options menu select “Colour Overlay” from the left menu and use these settings:
Then click on “Gradient Overlay” from the left hand side menu and use these settings:
Now click on “Ok” to save your changes.
That is it, you have turned a photograph of your city into a creepy ghost city.
This is the final result:
Hope you enjoyed.
- Jye
This tutorial is copyright to Creative Design Forum and Transcendent Studios 2009
If you liked this tutorial feel free to register an account if you haven't already done so.